Introduction toContinuous Line Drawing
One Line to Rule Them All!
Get ready for a drawing challenge that’s equal parts fun, focused, and a little bit wiggly — it’s time for continuous line drawing!
In this lesson, you’ll draw your subject using just one single line — that’s right, no lifting your pencil off the paper, not even once!
It might sound tricky at first, but this technique is a brilliant way to loosen up, stay present, and really connect your eyes with your hand. You’ll start to look more closely, move more confidently, and worry less about perfection.
It’s not about neatness — it’s about flow. Like a rollercoaster ride for your pencil! So pick your starting point, take a deep breath, and let your line dance across the page.
You may not need to erase anything but it’s good to have an eraser to hand just in case you change your mind about parts of your drawing. I like to get scribbly when drawing my initial outlines, which inevitably means erasing all my planning lines at some point as I neaten and refine my work.
![]()
You may not need to erase anything but it’s good to have an eraser to hand just in case you change your mind about parts of your drawing. I like to get scribbly when drawing my initial outlines, which inevitably means erasing all my planning lines at some point as I neaten and refine my work.
![]()
You will need something to draw on, so find yourself a sheet of cartridge paper, approximately 140gsm is perfect but so long as you’re not using printer paper you will be OK.
![]()
You’ll need a ruler to outline your boxes, but not for the cross-hatching. Measuring your shapes with a ruler can also be useful when trying to keep objects like vases looking symmetrical.
![]()
A Step-by-Step Guide to Continuous Line Drawing
You’ve only got one line, and it’s not allowed to stop. No lifting your pencil. No sneaky shortcuts. Just your hand, your eye, and your imagination going for a walk together!
Why is this exercise so awesome?
-
It helps you loosen up and draw more freely (no more stiff, robot lines!).
-
It teaches you to really look at what you’re drawing — not just guess.
-
It makes you brave, because you have to just keep going even if it gets a little wobbly.
-
And best of all? It’s fun. Like drawing on a rollercoaster!
Famous artists who have used cross-hatching
Artists like Paul Klee, Egon Schiele and Picasso all had a go at continuous line drawing:
Cross-hatching exercise:
Step-by-step:

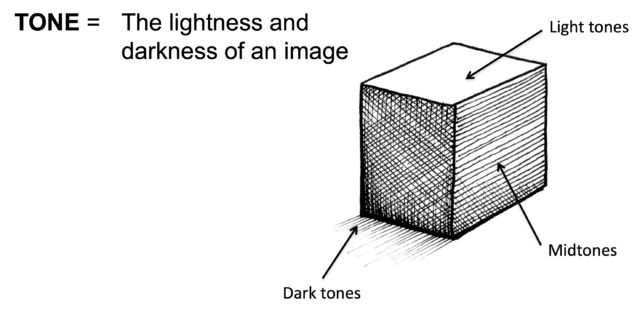
To begin with, practise your cross-hatching in a series of boxes, varying the number of intersecting lines you use to make change how light or dark your boxes are.
- Draw 6-8 boxes in pencil that are all the same size, using your ruler to keep them straight.
- You can leave the first box empty. That’s all you have to do for the lightest parts of your drawings!
- In the next box, neatly draw some diagonal lines that are all the same distance apart. You don’t need a ruler for these lines because you want your cross-hatching to look more sketched than that.
- In the following box, add another set of lines that go in a different direction. Having two sets of lines will make the box appear a bit darker.
- Continue to add cross-hatching to the remaining boxes, using more and more lines that get closer and closer together so that each box is darker than the last.
Once you’ve done the steps above you should have a nice stepped gradient, well done!
Have a go at creating another cross-hatched gradient, but this time you only need to draw one long rectangular box.
Try to create a gradient just like before, only this time you want it to transition from light to dark as seamlessly as you can, without any sudden changes.
Once you’ve got to grips with your shading gradients using cross-hatching, have a go at drawing a cross-hatched vase (or similar object).
- Lightly draw a line down the centre of your page. You will use this as a line of symmetry to help keep your drawing looking straight.
- Start with your initial outlines, using your ruler to check the left of your vase is the same distance from your line of symmetry on both the left and the right.
- Make sure the bottom of your vase is rounded.
- At the top of your vase draw an ellipse (like a narrow oval), rather than a circle.
Extra tip: if you draw contour lines on your vase you’ll find it easier to know where to cross-hatch
Add cross-hatching to your vase using a black fine-liner pen, just like you did on your practice gradient. The difference this time is that your gradients will follow the contours of the vase.
To keep it simple, draw a vase that is lighter towards the centre and darker towards the outside, then put a linear gradient on the ellipse at the top to create a shadow.
Top tips:
- Press lightly with your initial pencil lines
- Plan and measure your outlines carefully to make your symmetrical
- Draw by hand, without a ruler, when adding cross-hatching
- Vary your tones to make it look rounded and 3D
- Consider the direction of the light
The finished drawing:

Examples by other students:
What do you think has gone well and how might they be improved?
More examples of cross-hatching: